Wednesday, February 16, 2011

Julia & Justin Blizzard's Wedding.

I really wish I would have documented the processes of making all the crafts I made for Julia's wedding, but there's no way.  I was unbelievably busy.  Instead, I'll hastily post a few pictures of the finished products with little blurbs about what it is.  If I have the gumption, I'll look for any pictures that I DO have of my processes.  But here ya go.  Take my word for it, it was a really beautiful wedding.


I don't know if I subconsciously stole this from somebody, but I only say this because it turned out exactly as I had pictured it in my brain.  We collected random pieces of art and mirrors and hung them in this tree that was on the island on the farm that the ceremony took place on. 


The finished outside entrance to the barn which served as the banquet/dance hall.


The farm was about was many acres large and I thought this would be a cute way to help the guests figure out where to go. 


The centerpieces.  They were laying down because they kept being blown over by the gale-force winds that decided to show up that day.  This was pre-flowers, too.


The sign in table and guest book- an antique typewriter.  This was taken from a guest's camera at night.  I also made those terrariums. 


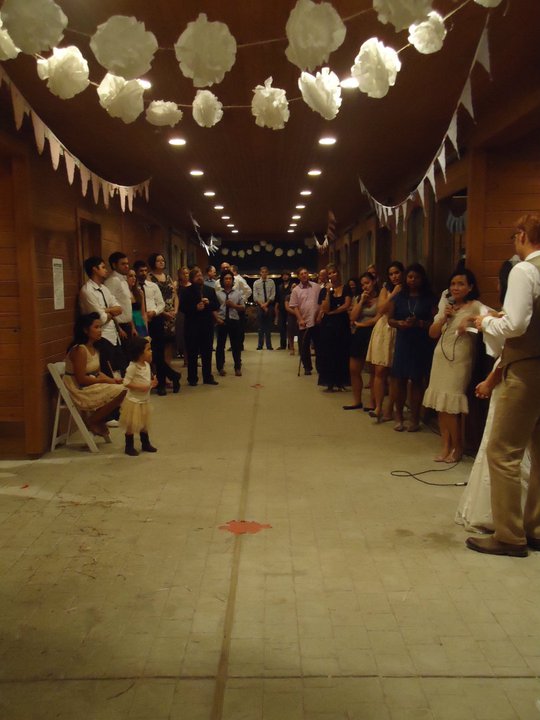
A long shot of inside the barn- Coffee filter pom poms and hand sewn bunting triangles.  My mom did the sewing!  I'm really terrible at it.  There I am sitting down!  I was tiiiired!


The outside of the barn, unfinished, but for some reason, the only shot of it in the day tie.  I hand painted those silhouettes too.  You've seen that blog.


All the professional grade photos in this blog entry were done by Josiah Marroquin.  I really enjoyed doing this wedding and it was really hard work.  Message me with any questions!

Wednesday, August 11, 2010

Baby Chloe- Baby Shower for my sister, Arianne.

Again, this blog is mostly showing you the outcome and not the steps to doing any of these crafts, but from now on, I promise to post step by step processes of each of the crafts I post here.  If you have any questions about any of the crafts I post, please feel free to contact me!

My sister, Arianne was pregnant with her second daughter, due in April.  She is mostly absent in the pictures because she was actually at her OBGYN because of contractions!  They turned out to be nothing and she ended up coming back just in time to open gifts and snag a few red-velvet cupcakes.  The theme she wanted was little birds or chicks, thankfully it was very close to Easter, so a lot of Chicky things were available.  Enjoy!

Here is the basic theme in a nutshell.  The colors were pinks, oranges, blues and greens.  I used plastic eggs, moss and a planter to make this table piece.  The bird is stitched with brown thread, something I only attempted once or twice because it didn't look too great up close.  
I used a pattern to make these chicks out of colored card stock and did the same for the contrasting wing colors.  They are outlined with a thin brown marker- the stitching too too long and didn't always come out looking great.  I thought these were adorable!
Another chick up close.  I hung them with jute string (one of my favorite things!) on the centerpiece of the buffet table.  It looked great!
The hardest thing to tackle for this event was these pompoms!  I used the almighty Martha Stewart's how-to for tissue paper pom poms, although I don't think any of mine turned out as full or as beautiful as hers did.  I did them in an array of different colors, trying to stick with the theme.  I found a much better method of creating full, beautiful pom poms that I will post about soon!
I also made these give aways- Iced sugar cookie chicks.  I always appreciate it when I go to a party where they feed me well and send me off with something sweet to eat for later on.  They were a big hit!
The give away table set up with my chick planters.  "C" was for Charlotte or Chloe or Cameron, the name hadn't been decided at the time, so she just asked me to scatter little "C"'s everywhere. 
The kitchen set up.  I also made the white  hanging ruffle on the right side of the screen, but there isn't a close up of them, so I'll include them in another blog.
A few of the ladies enjoying the shower, even without the celebrant.  It was a little while after this photo that she made it back safely, still preggers. 
Baby showers are such fine times to use your creativity.  Making special decorations for the shower, instead of buying all of them puts a unique and personal touch on the event.  Look around online for good inspiration and try your hand at DIY!  You'll be surprised at the outcome and glad that you put some extra love in making such a wonderful occasion even more special!

Monday, August 9, 2010

Christmas in August

Sadly, most of the decor I did for Christmas was store bought.  Since Indy's birthday was on Thanksgiving, I didn't have much time to prepare for Christmas, as I suppose will be the case EVERY year.  But I did manage to find really beautiful store bought decorations that I complimented with my own crafts.  I really love arranging a house for the Holiday season, it makes me feel all sentimental.  Here is the one craft I did for Christmas.  Paper Snowflakes!

This was my trial snowflake.  I'd never made snowflakes growing up, but always wanted to because they look so pretty and cool to me.  I used this How-To to learn my method as well as just searching on youtube for videos of people doing all the folding.  It's great to vary where you make your cuts and the size of the snowflake.  They all turn out different every time!  Just like a REAL snowflake!
I did about 12 snowflakes total in different sizes, using different types of paper.  Here you can see (on the far left- being cut off) I used a piece of plain paper, the large snowflake in the middle is a brown paper lunch bag and the tiny one is an old teaching hand out.  I really love the way the words looked on the paper.   I chose a woodland theme, so the colors and went really well.
Here was our cozy Christmas Corner.  The wreaths were nailed up onto the wall, but I can't find that pciture for some reason.  I made the garland out of tree trimmings and yes, that is a real fire :)
Some of the woodland decorations upclose.  These were all store bought, but they were absolutely perfect for the vision I had in my mind for what I wanted for our Christmas decor that year.
My son, Indiana in his Christmas swag.  So cute!  Another thing I did was save a lot of the packaging from Christmas gifts I had purchased for people online.  The gift directly behind Indy has a thick band of this really cool paper packaging they use... I don't know what it's called but it looks kind of like a honeycomb.  Of course, everything is enhanced by ribbon and jute string.  It's amazing how special a gift can look when you use real ribbon instead of those pre-packaged bags of ribbons that don't even really match your wrapping paper!


This was such a great Christmas!  I can't wait to decorate for this year!

Tuesday, August 3, 2010

Indiana's 1st birthday pt. 2

I also think I need to clarify that Indy is 20 months now, this party was a LONG time ago!  So you'll forgive me if the descriptions or instructions are short handed.   Here are some more goodies that I created for his bday!


Party Hats!  This as the most difficult craft out of all the ones I did for the party.  I used the all-knowing Martha Stewart's how-to on these which you can find here.  The only thing I changed was that I didn't use vellum for the tassel, I just cut a series of 2 inch cuts into the same piece of paper and rolled it over to form the tassel.
Here is Gracie and Indy's cousin Olivia (showing her sassy side) wearing the hats.  The kids found them too cumbersome to wear, so they were mostly just decoration/a give away.
I made a few extra balloons and put them on the cupcakes I also made for the party.  These were the "adult cupcakes" which were double chocolate.  The kids and Indy got Eggless Carrot cake because he had an allergic reaction to eggs a week or so prior to the party.  If you need the recipe, e mail me!  It's delicious!

Finally, not pictured are the give aways!  I am so heartbroken that I didn't get pictures of this!  I had been saving glass baby food jars for about a month for this give away.  I stripped the labels and made rectangles out of the same card stock the hats and birthday banner was made out of.  I cut the rectangles with patterned edge scissors and wrote "Thanks! Love, Indy" on them and hot glued them onto the jars.   I bought a bag of organic potting soil and a pack of organic green bean seeds.  At the party, as an activity, I had all the kids, with the help of parents, plant a seed in their pots to take home.   While we were doing the activity, I asked the kids that each time they watered the seed to please pray for Indiana and for his safety and future.  I thought this was a lot more fun and meaningful than a bag of candy that half of the guests are too young to eat!
I really enjoyed putting together the party.  I only wish I had taken more pictures so that Indiana can look back in a few years to see how special his 1st bday was because none of this mattered one bit to him!  So make sure your cameras are fully charged and that plenty of your adult guests bring their cameras, too!

Indiana's 1st birthday pt. 1

I'm both excited disappointed when I think about starting this series on Indiana's 1st birthday.  Excited because I really did hand make EVERYTHING for his birthday, and it all turned out pretty amazing.  Disappointed because I didn't take many pictures!  I hadn't planned on documenting everything, but would once in a while ask my husband to take a few pictures of my process.  But the most disappointing part is that my camera died half way through the party so I only got a few pictures of everything set up.  I'll try my best to describe my process in making everything, but no guarantees.  If you have questions about a specific thing, please email me!

When I started planning Indiana's birthday, I thought I wanted a real theme.  But then I quickly realized that he isn't really interested in anything.  I'm not gonna push "Where the Wild Things Are" on my 1 year old who is NOTHING at all like Max just because I wanted to see him in a fuzzy white outfit, sporting a crown on his head.  So instead, I just chose a few colors that I liked and did a lot of fun crafts to decorate the place.  I think it turned out pretty good.

This is the only picture I have of the invitations and it's the draft!  I kept it basically the same, but turned the background of his picture into a rectangle with rounded corners.  I had pictures of Indy in his Halloween costume printed at Kinkos on regular paper in 3x5 which made them really simple to work with.  I bought packages of plain greeting cards and envelopes at the Craft store which are really useful.  I cut balloon shapes and got a star punch for the "1" balloon and on the inside of the card was a brown cut out with all of the info for the wedding in gold writing.


A birthday banner.  I made these out of card stock that happened to be on sale when I went to Michael's, looking for inspiration.  I used the inside of a roll of duct-tape to trace circles onto the card stock and cut them out.  Then using a chisel-tipped gold paint maker, I wrote out "Happy Birthday Indiana" in individual letters.
I added a border around each letter, because they just looked too empty.  Then I punched holes on either side of the circle and threaded them onto some Jute String (which is one of my most favorite things!)  I also taped the back of each letter so they wouldn't turn or slide.  Make sure your strings are the appropriate length according to how you want to hang them.  I hung mine on top of one another, so the string that said, "Indiana" was the longest.
Details up close.
My second undertaking was some bunting.  I bought a pack of colored tissue paper  and used only the colors that worked with the theme, the rest I saved for Christmas (which was only a month away, Indy's bday fell on Thanksgiving eve last year).  I cut rectangles to about 4x2" with the idea that they would be folded in half.

This is very simple, all you need is colored tissue paper, string, scissors and glue sticks.

1. Cut rectangles according to how large you want your bunting squares to be
2.  Cut a length of string with at least a foot on either end that will be used to tie to a post or wherever you wish to hang your bunting string
2.  Create a pattern with the tissue rectangels
3.  Fold the tissue in half with the string in the crease and apply glue to both sides as well as on the string to ensure that the tissue stays and doesn't slide.  Glue sticks are best for this task as liquid glue will run and make the tissue look wilted and wrinkly.
4. Leave about a 6" gap between each square & repeat!
The finished product!  Store the banner by wrapping it around something tall and round.  I used a few wine bottles.  This will keep your squares from being folded or wrinkled and will also keep the entire banner from getting tangled in itself.  I made two 15-ft banners  and they really made the party seem a lively!

Monday, August 2, 2010

More Wall Art- Nana's Silver

My Mother in Law gave me my Grandmother in Law's old silver.  They are vintage, a bit tarnished and beautiful in every way.  There is also a "K" monogrammed on the handle of each piece, 'K' for Krepcho, of course.  I was unbelievably honored to have gotten such a precious heirloom that I wanted to immortalize it in some way.  I decided to take pictures of each a fork, spoon and a knife, have them blown up and hang them on the wall in my kitchen.  They turned out beautifully.

I used a bit of black ash from the fire place to fill in the detail on the handle, it was fine enough to fit into the crevices without having to mark on the silver itself.
The background is the deck in my back yard.  My only regret from this  project is my reflection in the spoon!  I couldn't find a way to do it without my reflection showing in the spoon.  Every other position distorted the shape and size of the spoon, making them different than the other utensils.
I also kind of wish the monogram was the other way so that the utensils could be "head up" instead of down, but they still turned out nice.
I think these are 20 x 22.  I love them.  I used some old Ikea pictures (of sand, stone and water...or something equally zen and boring) and photo spray glue and used them to hang the pictures on.  This was before I straightened them out!

This project can just as easily be done with your own favorite silver or utensils on a different back ground.  I had them professionally printed, I think the total cost was around $60.  Not bad for some kitchen art that has sentimental value.  My in-laws were tickled when they came to visit.  And I think of Nana every time I see them.

Halloween- Day of the Dead Skullzzzzz!

I know it's the beginning of August, but I want to get this blog up and running so I'm going to post it now and probably again in October.

I've always liked the look of Day of the Dead skulls and I thought a fun activity would be to make some of my own.  It is a long and tedious process, but with one of the best results!  Here are pictures and steps for making your own Day of the Dead Skull.  You will need:

-1 skull.  I found a styrofoam skull at a craft store for around $5.
 -foil scraps of cloth or an old tshirt
- papier mache paste (recipe follows)
- strips of news paper
- paints or fine tipped paint pens/markers.
- laquer of some kind.

Papier Mache paste recipe:
1/2 cup of glue
2 or 3 TBL cornstarch

Add cornstarch until you get the consistency that you want, you can also add a tiny bit of water if it gets too thick.  It should be thick enough to coat your strips really well.

Start by wrapping the skull in foil. DO NOT USE GLUE.  This is step 1 in creating a mold of a skull that you will paint.   By using foil, you can include details by pressing the foil into the teeth or eyes.   You may choose to include the eye caverns or to just run foil across them at a more shallow depth.   I did both.

Using scraps of cotton or other rags and glue cover the skull completely.  This will allow the papier mache to take the shape of the skull since it will not stick to foil.  The foil keeps the papier mache from sticking to the skull.  Allow the glue to dry completely before continuing to the next step

Papier Mache Madness!  Dip your strips of newspaper into the paste mixture making sure they are well coated.   Stick them on the skull, overlapping each strip with the next until the skull is completely covered.  Make sure to leave a hole in the bottom that is big enough to put your hand in.  Also be sure to include details that you wish to paint- teeth, eyes.  As you can see, this can get really messy, put a paper plate under your skull to catch any paste that drips off of your skull.  I also used a half-full (OPTIMIST!!) water bottle to prop it up.
After covering the skull completely, brush with more paste and press out any bubbles to smooth out the appearance as much as possible.  I used one of those $.50 foam brushes because this stuff will ruin your good brushes.  Let this dry over night or more!  If you layered it on thick, it may take a day and a half or so.

A VERY IMPORTANT STEP BEFORE MOVING ON:  
After the papir mache is dry, use an exacto blade and cut a slit in the back of the skull that runs down the middle to the base of the skull.  This allows you to remove the styrofoam skull that you used as a base shape.  Close the slit by mending with fresh papier mache strips and allow to dry over night if necessary.
Get painting!


Half way through- this is a pained smile.  "I'M SO TIRED OF THIS SKULL!"

I thought a black & white one would be interesting, and it is.

The detail on the back.  I allowed them to dry over night and then covered them with a gloss or a laquer for that extra sheen.  I love this project and even though it took 3 days total, I'd do it again!

Happy Halloween!